고정 헤더 영역
상세 컨텐츠
본문
* 실습을 위한 EKS를 배포하기

1) CloudFormation을 통해 인프라 생성하기
# CloudFormataion 템플릿 다운로트 (JSON 또는 YAML 형식의 텍스트 파일)
curl -O https://s3.ap-northeast-2.amazonaws.com/cloudformation.cloudneta.net/K8S/myeks-1week.yaml
- AWS 콘솔 사용하기 > Create stack : next 클릭

- Specify stack details : 설정 값 입력 후 next 클릭


CloudFormation 설정 값에 따른 EC2가 생성되었습니다.

2) 서버 정보 확인
- 버전 확인


3) EKS 연결을 위한 IAM User 자격 증명 설정
실습을 위해 adminitrator 권한을 가진 IAM User의 자격 증명을 사용했습니다.

- 자격 구성 적용 확인 : 인스턴스 정보가 정상적으로 불러와집니다.

4) EKS 설치를 위한 변수 지정
4-1) 배포할 VPC 정보 확인
aws ec2 describe-vpcs --filters "Name=tag:Name,Values=$CLUSTER_NAME-VPC" | jq
aws ec2 describe-vpcs --filters "Name=tag:Name,Values=$CLUSTER_NAME-VPC" | jq -r .Vpcs[].VpcId
export VPCID=$(aws ec2 describe-vpcs --filters "Name=tag:Name,Values=$CLUSTER_NAME-VPC" | jq -r .Vpcs[].VpcId)
echo "export VPCID=$VPCID" >> /etc/profile
echo $VPCID
4-2) EKS 배포할 VPC에 속한 Subnet 정보 확인
aws ec2 describe-subnets --filters "Name=vpc-id,Values=$VPCID" --output json | jq
aws ec2 describe-subnets --filters "Name=vpc-id,Values=$VPCID" --output yaml
4-3) 퍼블릭 서브넷 ID 확인
aws ec2 describe-subnets --filters Name=tag:Name,Values="$CLUSTER_NAME-PublicSubnet1" | jq
aws ec2 describe-subnets --filters Name=tag:Name,Values="$CLUSTER_NAME-PublicSubnet1" --query "Subnets[0].[SubnetId]" --output text
export PubSubnet1=$(aws ec2 describe-subnets --filters Name=tag:Name,Values="$CLUSTER_NAME-PublicSubnet1" --query "Subnets[0].[SubnetId]" --output text)
export PubSubnet2=$(aws ec2 describe-subnets --filters Name=tag:Name,Values="$CLUSTER_NAME-PublicSubnet2" --query "Subnets[0].[SubnetId]" --output text)
echo "export PubSubnet1=$PubSubnet1" >> /etc/profile
echo "export PubSubnet2=$PubSubnet2" >> /etc/profile
echo $PubSubnet1
echo $PubSubnet2

5) EKS 배포하기 (eksctl)
# eksctl로 EKS를 배포하기 위해서는 아래 변수의 값이 필요합니다.
echo $AWS_DEFAULT_REGION
echo $CLUSTER_NAME
echo $VPCID
echo $PubSubnet1,$PubSubnet2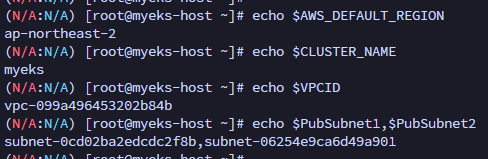
# EKS 클러스터 & 관리형 노드 그룹 배포 전 정보 확인하기
# --dry-run 옵션으로 실제 수행은 되지 않지만 수행될 잡의 명세를 확인할 수 있다.
eksctl create cluster --name $CLUSTER_NAME --region=$AWS_DEFAULT_REGION --nodegroup-name=$CLUSTER_NAME-nodegroup --node-type=t3.medium \
--node-volume-size=30 --vpc-public-subnets "$PubSubnet1,$PubSubnet2" --version 1.31 --ssh-access --external-dns-access --dry-run | yh
# EKS 배포 실행
eksctl create cluster --name $CLUSTER_NAME --region=$AWS_DEFAULT_REGION --nodegroup-name=$CLUSTER_NAME-nodegroup --node-type=t3.medium \
--node-volume-size=30 --vpc-public-subnets "$PubSubnet1,$PubSubnet2" --version 1.31 --ssh-access --external-dns-access --verbose 4
eksctl로 CloudFormatin Stack을 생성하여 리소스를 생성하기 때문에 CloudFormation에서 생성되는 과정을 확인할 수 있습니다.


6) EKS 서버 정보 확인
# API의 Endpoint 주소 확인 가능
k cluster-info
# 클러스터 정보 확인 가능
eksctl get cluster
aws eks describe-cluster --name $CLUSTER_NAME | jq
aws eks describe-cluster --name $CLUSTER_NAME | jq -r .cluster.endpoint

# API 서버 NLB의 공인 IP 확인
APIDNS=$(aws eks describe-cluster --name $CLUSTER_NAME | jq -r .cluster.endpoint | cut -d '/' -f 3)
dig +short $APIDNS
# EKS API 접속 확인 (version 경로는 별도 인증 절차없이 접속 가능)
curl -k -s $(aws eks describe-cluster --name $CLUSTER_NAME | jq -r .cluster.endpoint)
curl -k -s $(aws eks describe-cluster --name $CLUSTER_NAME | jq -r .cluster.endpoint)/version | jq


# eks 노드 그룹 정보 확인
eksctl get nodegroup --cluster $CLUSTER_NAME --name $CLUSTER_NAME-nodegroup
aws eks describe-nodegroup --cluster-name $CLUSTER_NAME --nodegroup-name $CLUSTER_NAME-nodegroup | jq

### 노드 정보 확인

# OS와 컨테이너런타임 확인
kubectl get node --label-columns=node.kubernetes.io/instance-type,eks.amazonaws.com/capacityType,topology.kubernetes.io/zone

# 노드의 capacityType 확인
kubectl get node --label-columns=eks.amazonaws.com/capacityType

kubectl get node
kubectl get node -o wide
kubectl get node --label-columns=node.kubernetes.io/instance-type


# 인증 정보 확인 : EKS api 서버로 질의를 날리는 것은 자격 증명이 통과되었다는 뜻
 # 디버그 레벨(v)옵션을 높히면 api 서버로 어떠한 정보를 조회할 때 /root/.kube/config를 load합니다.

kubectl get node -v=6
/root/.kube/config 내부 자격 증명
kubectl config view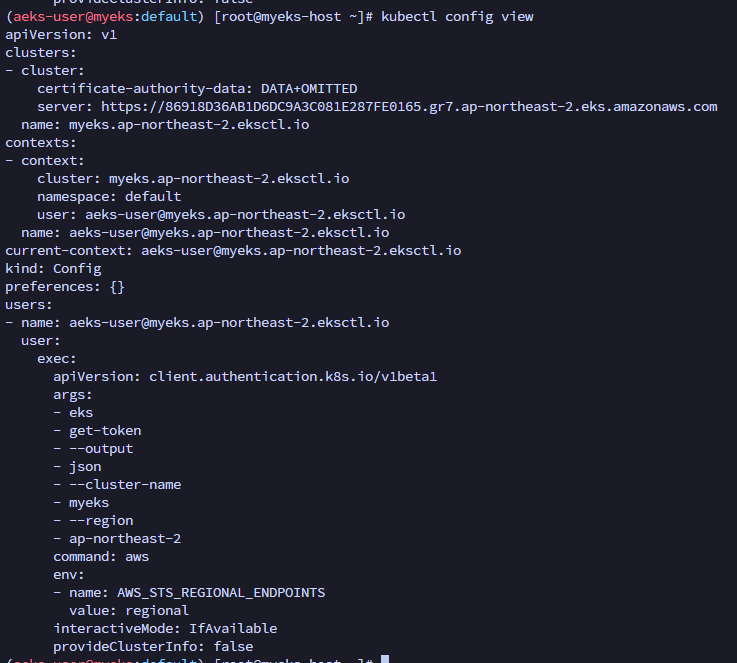
# EKS 클러스터에서 사용하는 인증 토큰 얻기
aws eks get-token --cluster-name $CLUSTER_NAME --region $AWS_DEFAULT_REGION
# 파드 정보 확인
kubectl get pod -n kube-system
kubectl get pod -n kube-system -o wide
kubectl get pod -A
kubectl top node
kubectl top pod -A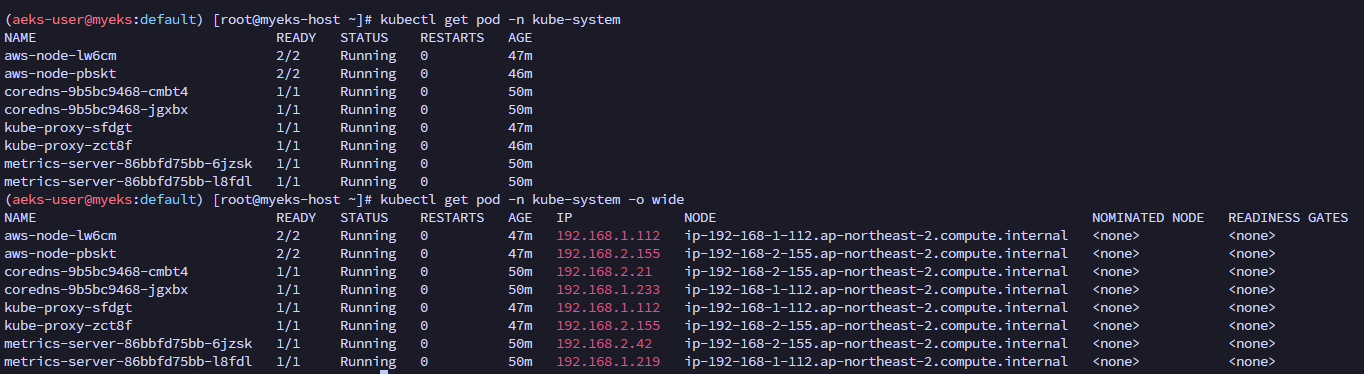


 # kube-system 네임스페이스에 모든 리소스 확인
 kubectl get-all -n kube-system
kubectl get-all
# 모든 파드의 컨테이너 이미지 정보 확인
# 파드는 멀티 컨테이너 안에서 동작이 가능, aws 노드 데몬셋 파드 안에 cni 역할 컨테이너와 aws-network-policy 에이전트 컨테이너 2가지가 있다.

kubectl get pods --all-namespaces -o jsonpath="{.items[*].spec.containers[*].image}" | tr -s '[[:space:]]' '\n' | sort | uniq -c
'Cloud > Kubernetes' 카테고리의 다른 글
| [AEWS3기] 2주차 - EKS Networking (2) (0) | 2025.02.14 |
|---|---|
| [AEWS3기] 2주차 - EKS Networking (1) (0) | 2025.02.13 |
| [AEWS3기] 1주차 - Amazon EKS 설치 및 기본 사용 (4) (0) | 2025.02.08 |
| [AEWS3기] 1주차 - Amazon EKS 설치 및 기본 사용 (2) (0) | 2025.02.05 |
| [AEWS3기] 1주차 - Amazon EKS 설치 및 기본 사용 (1) (0) | 2025.02.04 |


